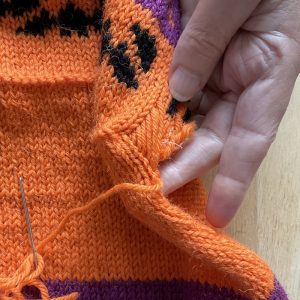
How to Seam Your Cushion
This photo tutorial is intended to help you seam your cushion. Mattress stitch, a way of joining vertical edges in knitting, is used to give a strong, invisible seam.
 Step 1
Find the column of stitches indicated by the needle
 Step 2
Follow the column down to the fold row and place stitch marker as shown
 Step 3
Locate and mark stitch indicated above
 Step 4
Insert needle in lower marked stitch from wrong side (WS) of knitting as shown
 Step 5
Insert needle in upper marked stitch as shown
 Each stitch contains a little bar like this, go under it with your needle as shown
 Step 6
Remove lower marker and insert needle under bar in stitch as shown
 Step 7
Remove upper marker and insert needle under bar in stitch above as shown
 By stretching the knitting sideways it is easier to see the little bars inside each stitch
 Continue as in steps 6 and 7 working one stitch lower and one stitch higher each time
 After a few passes your corner should look like this
 Whilst holding the tail underneath, pull your working yarn and watch as the seam magically closes up!
Continue working your way up the seam, pulling to close every 10 or so stitches.
 When you get to the top of the seam work under the last bar below your cast off edge.
 Go back under the cast off edge as shown above.
 Fasten off and sew in your ends.
Repeat for bottom back seam on opposite side.
 Make your last stitch under the bar on the opposite side as shown
The top back seams are sewn in the same way.
When you reach the point where the top back overlaps the bottom back it will look like this:
 The seam continues in the same way
 By stretching the bottom back seam apart slightly you can find the bars on the front panel you used to make that seam.
Use the same bars for the remainder of the top back seam.
 Work the last stitch and cast on edge in the same way as bottom back seam.
 Ta-dah! All finished!
Copyright © 2023 StitchyDragonCreates